Install Windows Home Server 2011 and Getting Started
Table of Content
I know that you can do it on other versions of Windows Server using Terminal Services but concerned that Microsoft may have taken something out of the Home version that cripples its capability. I am thinking of primarily of Office 2010, our camera software to download pictures and a few favourite games like Spider Solitare, Freecell, Solitare, and Scrabble. I would use it as my desktop and would set up both an Administrator and a user acccount for myself. You’ll download wlsetup-web.exe – launch the file and follow the wizard.
Please don't scroll past this—the Internet Archive is growing rapidly, and we need your help. As an independent nonprofit, we build and maintain all our own systems, but we don’t charge for access, sell user information, or run ads. Instead, we're powered by donations averaging $25.51. We'd be deeply grateful if you'd join the one in a thousand users that support us financially. The client connector software is installed. When it’s finished, you’ll get the following message.
Please sign in to comment
You’ll see a series of different screens while the server is installed. There is no user interaction required during this stage. Right now, we have a 2-to-1 Matching Gift Campaign, tripling the impact of every donation.
First, sign in with the password you gave your server. Next, click Options and check to remember the password and select add-ins to load. That is all the information WHS 2011 needs from you. This next stage of the install takes the longest amount of time.
plus-circle Add Review
Start with “Get Update for Other Microsoft Products” and work your way down the list. Then continue to work through the wizard. You’re asked to enter a description of the client computer, whether or not to wake it up for backup, and if you want to join the MS Improvement Program. Windows Home Server 2011 has been installed and is ready to use.

From there you should see the Home Server Connector Software folder and double click on Setup.exe. Probably the easiest way to install the software is directly from the server. In Windows 7 open up Network and you should see your server listed.
Windows Home Server 2011
The server will reboot a couple of times during the first stage of the install. First, make sure the system is set to boot from the DVD drive first. You can do this in the BIOS or hit the appropriate key during startup to select a temporary boot device. Next, pop the install DVD you bought into your system’s drive. BitLocker encryption—On Windows 10 PCs, OneDrive automatically syncs your Personal Vault files to a BitLocker-encrypted area of your local hard drive. Scan and shoot—Using the OneDrive app, you can scan documents or shoot photos directly into your Personal Vault, keeping them off less secure areas of your device, like your camera roll.
However, WHS 2011 has been out for several months now, and I’ve decided to upgrade. Here’s how to do a clean install of WHS 2011. I’m currently running Windows Home Server – version one which runs on Microsoft Server 2003 technology.
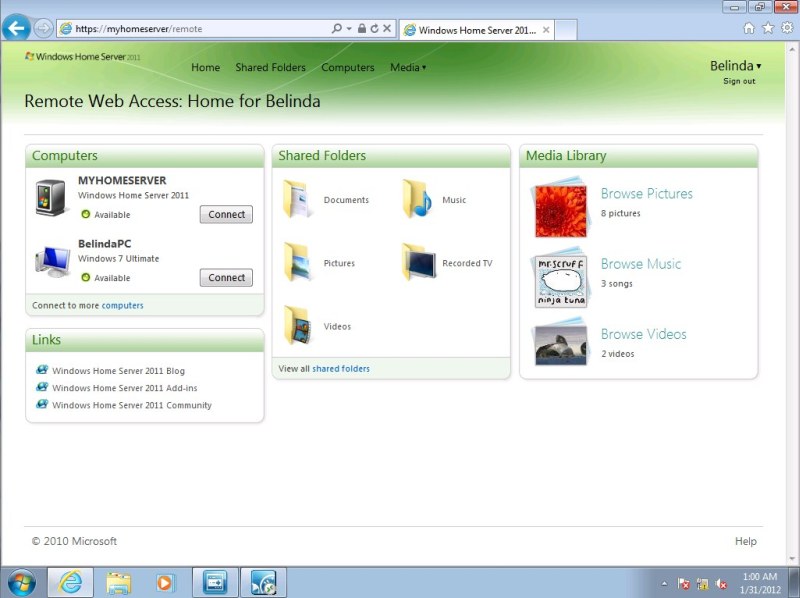
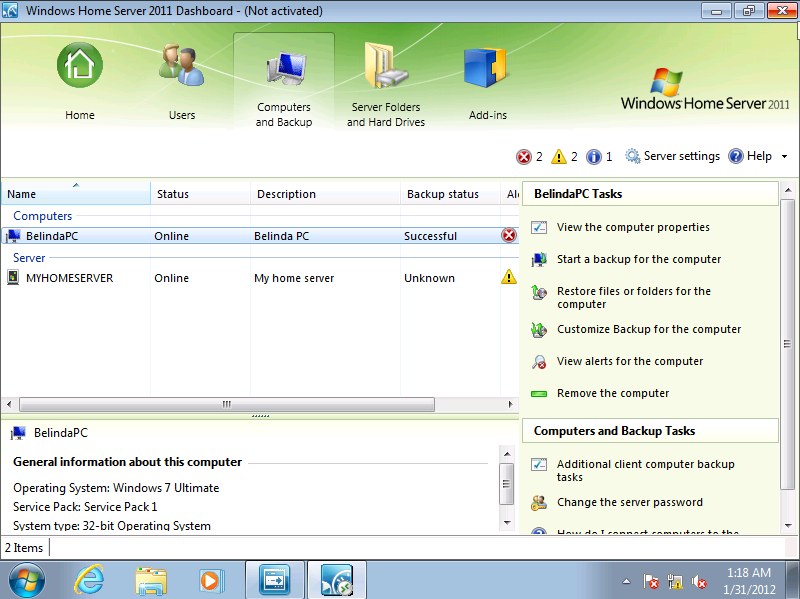
I have bought, built and managed Windows Servers and desktops since 1994. I am comfortable in doing almost anything IT, just do not have any experience with this product. After signing in, you’re presented with the Windows Home Server 2011 Dashboard. This is where you’ll do the majority of your admin activity with the server.
After that, your server will be updated and configured to use. It will take a half-hour or more – depending on your system specs. After that, you can leave it alone and check on it periodically to make sure everything is working correctly. Next, select the drive you’re installing WHS 2011 to. Check the box that you know the data on the drive will be wiped. I’m currently running Windows Home Server – version one, which runs on Microsoft Server 2003 technology.
When it gets to the following screen, you’ll need to enter some information. Verify your Country, Time and Keyboard Layout. The first screen you’ll need to interact with is selecting a New Install or Repair.

The system will verify you have the necessary components, such as Microsoft .NET Framework 4.0 or later. If you don’t, the installer will download and install it for you automatically. Once the local disk is recognized, start the installation. Again, the process looks like installing Windows 7.


Comments
Post a Comment